
If you’re looking to install a new operating system, boot from a USB drive, or troubleshoot your system, changing the boot order in Windows 10 laptop is often the first step. The boot order BIOS controls the sequence of devices your laptop uses to start up, such as the hard drive, USB, or DVD drive. Follow this simple guide to change the boot order in BIOS and take control of your system’s startup process.
Why You Might Need to Change the Boot Order in Windows 10 Laptop:
- Install Windows from USB: If you’re installing a new copy of Windows from a USB flash drive.
- Boot from a CD/DVD: Useful for installing older software or running repair tools.
- Run Diagnostics: Booting from an external device may be necessary to run diagnostic tools for troubleshooting.
Steps to Change the Boot Order in Windows 10 Laptop:
1. Restart Your Laptop to access in BIOS
The first step is to restart your laptop. But before you restart, save any work and close all open programs.
2. Method to Access the BIOS/UEFI Settings
The BIOS/UEFI is where you can change the boot order. There are two common methods to access it:
- Method 1: From the Windows 10 Settings
- Click Start and go to Settings.
- Navigate to Update & Security.
- Select Recovery from the left panel.
- Under Advanced startup, click Restart now. Your laptop will reboot into the recovery options menu.
- Select Troubleshoot > Advanced options > UEFI Firmware Settings and click Restart.
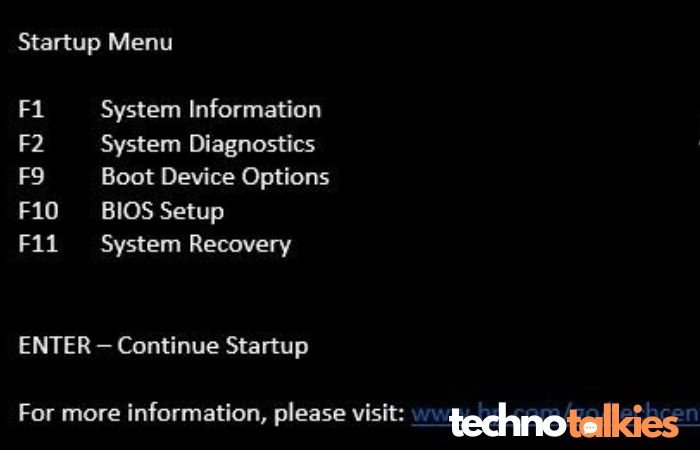
- Method 2: Using a Hotkey During Startup Many laptops allow you to enter BIOS/UEFI by pressing a specific key during startup. The key varies by manufacturer:
- Dell: F2 or F12 (Change Boot Order in BIOS for Dell)
- HP: Esc or F10 (Change Boot Order in BIOS for HP)
- Lenovo: F1 or F2 (Change Boot Order in BIOS for Lenovo)
- Acer: F2 (Change Boot Order in BIOS for Acer)
- ASUS: F2 As soon as your laptop powers on, repeatedly press the designated key to access BIOS.
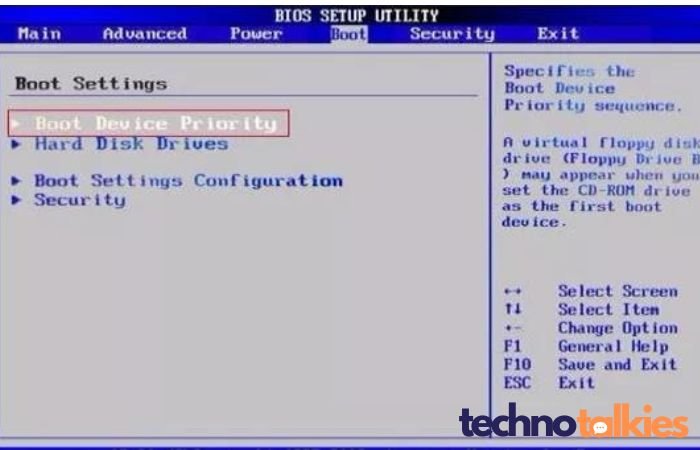
3. Locate the Boot Menu
Once inside the BIOS/UEFI interface, use the arrow keys to navigate to the Boot tab. Here, you’ll see a list of devices your system can boot from, such as the internal hard drive, USB drives, or DVD/CD drives.
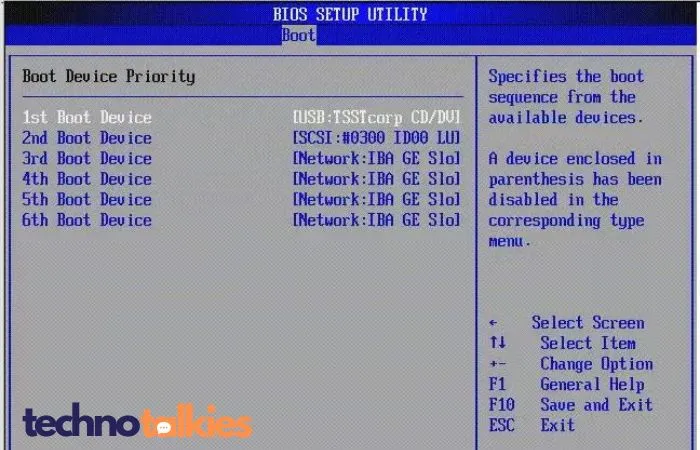
4. Change the Boot Order
To change the boot order in Windows 10 laptop:
- Use the arrow keys to highlight the device you want to boot from.
- Follow the on-screen instructions (usually +/- or F5/F6) to move your preferred boot device to the top of the list.
For example, if you’re trying to boot from a USB drive, make sure it’s at the top of the boot order.
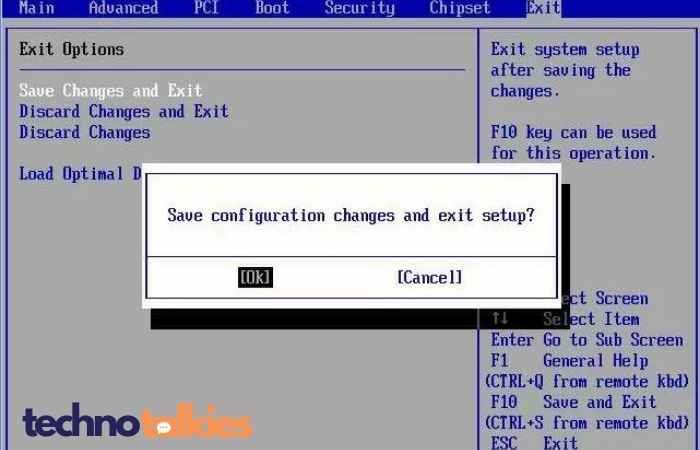
5. Save and Exit
After making your changes:
- Navigate to the Exit tab or section.
- Select Save changes and exit (or a similar option).
- Your laptop will restart, and it will boot from the device you prioritized.
You might also be interested in reading this related topic: How to check or change the boot order on a laptop
Common Issues and Troubleshooting
If you’re unable to access the BIOS/UEFI or change the boot order in Windows 10 laptop, here are a few things to try:
- USB Not Detected: Make sure the USB device is properly formatted as bootable and plugged in before starting the laptop.
- Fast Boot Enabled: Some systems may skip the boot menu due to “Fast Boot.” You can disable this option in the BIOS/UEFI.
- Incorrect Boot Device: Double-check that the device you’re trying to boot from is at the top of the list.
Final Thoughts
Changing the boot order in Windows 10 laptop is a simple yet essential skill for anyone looking to install new software, troubleshoot their system, or perform diagnostic tasks. Follow these steps carefully, and you’ll be able to boot from any device with ease.