

Over time, your Windows laptop collects a lot of temporary files that use up storage space and can slow it down. These files are automatically created by the system, software updates, and apps, but they often aren’t needed after a while. Regularly delete temporary files can free up space and make your laptop run faster. In this guide, we’ll show you how to easily delete temporary files to keep your laptop running smoothly.
What Are Temporary Files?
Temporary files are time being data that Windows and installed applications store to temporarily hold information. Examples of temporary files include:
- Cache files
- Log files
- Windows update files
- Application-generated temp files
While they serve a purpose, over time, they can build up and hog precious space on your hard drive.
Note: You might also be interested in reading this related topic: How to Free Up Windows laptop Disk Space
Why We Should Clean Temporary Files
Deleting temporary files from your Windows laptop offers several benefits:
- Frees up disk space: Temporary files can take up gigabytes of storage, especially after updates.
- Improves performance: Reducing clutter can make your laptop run more efficiently.
- Boosts software functionality: Some programs may function better after old temp files are removed.
- Keeps your system clean: Regular maintenance prevents unnecessary files from piling up.
How to Delete Temporary Files in Windows Laptop: Step-by-Step Guide
1. Use the Built-In Disk Cleanup Tool
Windows comes with a built-in tool called Disk Cleanup that helps you remove temporary files and other unnecessary data.
Steps:
- Press Windows + S and type Disk Cleanup in the search bar.
- Select Disk Cleanup from the search results.
- Choose the drive you want to clean (typically, the C: drive).
- The system will calculate how much space can be freed up.
- Check the box next to Temporary files and any other categories you want to delete, such as Recycle Bin and Downloaded Program Files.
- Click OK and then Delete Files to confirm.
This method will safely delete temp files and help recover space on your drive.
2. Clear Temp Files Using File Explorer
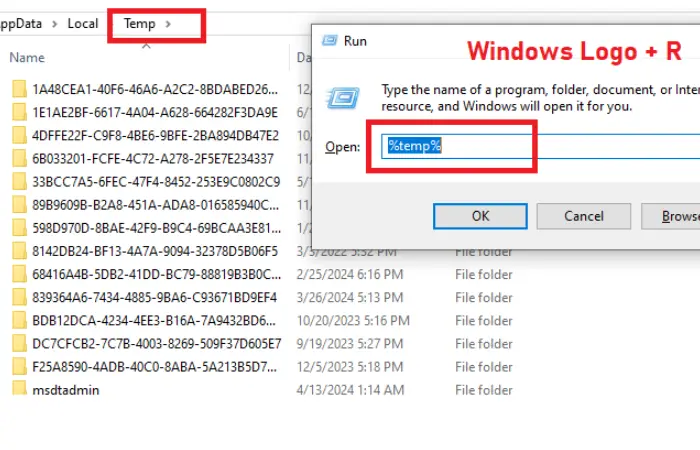
- Press Windows + R key together to open the RUN window.
- In the pop-up window, type in %temp% and click OK.
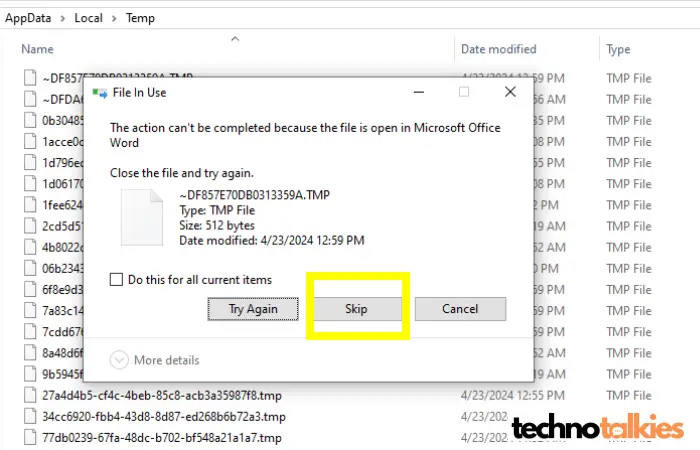
- Temporary Folder will open. Delete everything in the Temporary Folder.
- Right-click on Recycle bin. Click Empty Recycle Bin.

- If you receive any warnings while deleting the temporary files and folders, choose ‘Skip‘ to continue deleting.
3. Remove Temp Files from system via Settings
You can also delete temporary files using the Settings app, which is another easy method for Windows 10 and 11 users.
Steps:
- Go to Settings by pressing Windows + I.
- Click on System and then select Storage from the left-hand menu.
- Under Local Disk (C:), click on Temporary files.
- Wait for Windows to analyze the files, then select the categories of temp files you want to delete, such as Temporary Internet Files, Delivery Optimization Files, or DirectX Shader Cache.
- Click Remove files to free up the space.
This method allows you to manage not only temporary files but also other unnecessary system files in one place.
4. Automate Cleanup with Storage Sense
If you want to keep your laptop clutter-free without constantly managing temporary files yourself, you can enable Storage Sense, a Windows feature that automatically delete temporary files.
Steps:
- Go to Settings and select System.
- Click Storage, then toggle on Storage Sense.
- Click Configure Storage Sense or run it now to customize how often temporary files are deleted. You can set it to run when space is low, or schedule cleanups daily, weekly, or monthly.
This ensures that Windows automatically cleans out unneeded files, saving you time and effort.
Best Practices for Managing Temp Files
- Regular Cleanup: Aim to clean up temp files at least once a month to keep your system performing optimally.
- Backup Before Major Deletion: Though rare, some temp files may be needed for certain applications. Back up important data before major cleanups.
- Monitor Storage: Check your storage usage regularly to identify when temp files or other unnecessary files are starting to take up too much space.
Finnaly
Temporary files are a natural byproduct of using a Windows laptop, but they can pile up over time and reduce your system’s efficiency. By regularly delete temporary files using built-in tools like Disk Cleanup or automating the process with Storage Sense, you can free up storage space and boost your laptop’s overall performance.
You might also be interested in reading this related topic on Microsoft: how to delete temporary files