As security standards in modern computing continue to rise, TPM (Trusted Platform Module) has become increasingly essential for protecting sensitive data and enabling advanced features like Windows 11. Moreover, if your PC doesn’t meet the TPM 2.0 requirement, you won’t be able to upgrade to Windows 11 or take advantage of certain encryption and security features. In this guide, we will walk you through the steps to check if your PC supports this module and how to TPM 2.0 enable.
What is TPM 2.0?
TPM 2.0 is a security chip embedded in your PC’s motherboard that provides hardware-based protection for sensitive data, such as encryption keys and passwords. It ensures secure boot, protects the integrity of your system, and enables features like BitLocker encryption.
Why is TPM 2.0 Important?
Starting with Windows 11, Microsoft made TPM 2.0 a mandatory requirement to enhance security. TPM 2.0 also supports encryption, digital signatures, and various other security-related functions, helping protect against unauthorized access and malware attacks.
If your PC doesn’t have TPM 2.0 enabled, you may face limitations in upgrading or accessing certain advanced security features.
How to Check if Your PC Has TPM 2.0
- Before enabling TPM 2.0, you need to check whether your system supports it. Follow these steps:
- Press Windows + R to open the Run dialog box.
- Type tpm.msc and hit Enter.
- If a TPM window opens and shows “The TPM is ready for use,” your PC already has TPM 2.0 enabled.

5. If you see a message stating, “Compatible TPM cannot be found,” you may need to enable it in your BIOS.

Version Compatibility
If you see a message confirming TPM is ready to use, check Specification Version under TPM Manufacturer Information to verify it is 2.0. If it is less than 2.0 your device does not meet the Windows 11 requirement.

Steps to Enable TPM 2.0 in BIOS
If TPM 2.0 is not enabled, you can activate it via your BIOS settings. Here’s how: Learn more on Microsoft.com
1. Access Your BIOS/UEFI Settings
- Restart your PC and during startup press the designated key to enter BIOS. The key varies by manufacturer, but it’s usually F2, F10, Del, or Esc. You can check your PC’s manual or search online for your model’s specific key.
- Continue holding the key as your PC boots into BIOS. To learn how to How to Access into BIOS and Reset to Default.
2. Find the TPM or Security Settings
Once you are in BIOS, look for the Security or Advanced settings tab. This location may vary depending on your motherboard’s manufacturer. Common names for TPM 2.0 in BIOS include:
- TPM (Trusted Platform Module)
- Intel PTT (Platform Trust Technology) – for Intel systems
- AMD PSP fTPM – for AMD systems
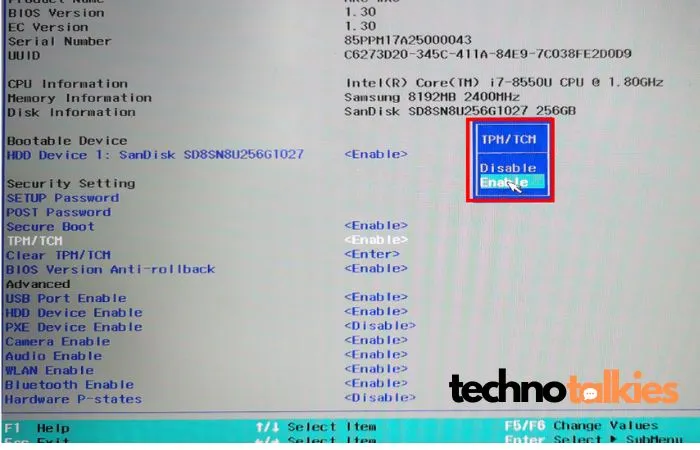
3. Enable TPM 2.0
- After locating TPM settings, set it to Enabled.
- On some PCs, you may need to enable Secure Boot as well.

4. Save and Exit BIOS
- Once TPM 2.0 is enabled, save your settings and exit BIOS. Your PC will restart.
5. Verify TPM 2.0 is Enabled or Not
- After rebooting, press Windows + R, type tpm.msc, and press Enter.
- You should now see “The TPM is ready for use” in the TPM management window, indicating that TPM 2.0 is successfully enabled.
If your computer does not come with TPM, the message Compatible TPM cannot be found will be displayed. That means your laptop or computer does not meet the Windows 11 requirement
Troubleshooting TPM 2.0 Issues
If you cannot enable TPM 2.0 or the option is missing in BIOS, your PC may not support TPM, or you might need a firmware update. Check your motherboard’s documentation or the manufacturer’s website for any BIOS updates that could add TPM 2.0 support.
Conclusion
Enabling TPM 2.0 (Trusted Platform Module) on your PC is crucial for security and compatibility with Windows 11. Whether you’re aiming for enhanced protection or preparing for system upgrades, ensuring the Trusted Platform Module is active not only provides peace of mind but also keeps your system secure. If you’re looking to upgrade to Windows 11 or take advantage of advanced security features, enabling TPM 2.0 is not only a straightforward but also an essential step. By following the guide above, you can ensure your PC is fully prepared for the future.

