A laptop that won’t connect to WiFi is frustrating, especially when you’re in the middle of work, streaming, or just trying to browse the web. Fortunately, most WiFi connection issues on a Windows laptop can be resolved with a few simple troubleshooting steps. In this guide, we’ll walk you through the most common causes and solutions to fix laptop that won’t connect to WiFi.
Through this article, you will learn how to fix your laptop that won’t connect to WiFi.
Some basic reasons why laptop won’t connect to WiFi connection
- Maybe Wi-Fi adapter is Disabled
- Check your laptop’s Wi-Fi button or switch
- Your router is down or not connected to the internet.
- Your laptop is too far from your router.
- Your device may not support the Wi-Fi network it’s connecting to.
- Outdated or corrupted Wi-Fi Driver
Let’s start to Fix the Windows Laptop that won’t connect to WiFi
Through this guide, we will find all the reasons, and whatever the reason, don’t worry; this Techno Talkies guide will help you fix the issue step by step :
In this article, we will address and fix the issues in two segments:
- Finding and fixing the issue on the network side.
- Finding and fixing the issue on the laptop side.
Finding and fixing the issue on the network side.
Step 1: Restart your Internet router.
When a WiFi connection issue arises, the first thing you must do is restart your internet router. A restart will often fix this issue. To do so:
- Disconnect the cables from the router
- Switched off the router for 60 seconds.
- Switched on the router and connected the cables.
- Reconnect your laptop to the router.
- Check whether you can access the internet or not.
If the problem still persists, then follow the next step.
Step 2: Resetting IP and DNS
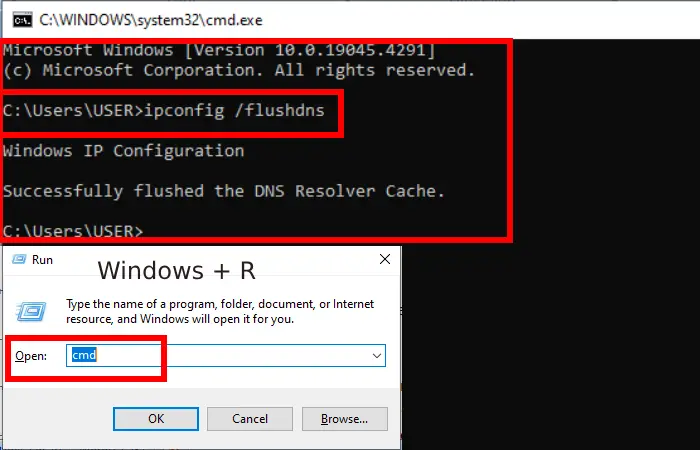
Resetting the TCP/IP, flushing DNS cache, and releasing IP address through command line To do this, follow the steps below:
- Press Windows logo + R on your laptop keyboard
- Type cmd, and press Ctrl + Shift + Enterto open Windows>System32 Command Line.
- Type below each Command and Press Enter to Execute the command.
- netsh winsock reset
- netsh int ip reset
- ipconfig /release
- ipconfig /renew
- ipconfig /flushdns

If the problem still persists, then follow the next step.
Step 3: Forget Your Network and Reconnect
This is simple process that works most of the time.
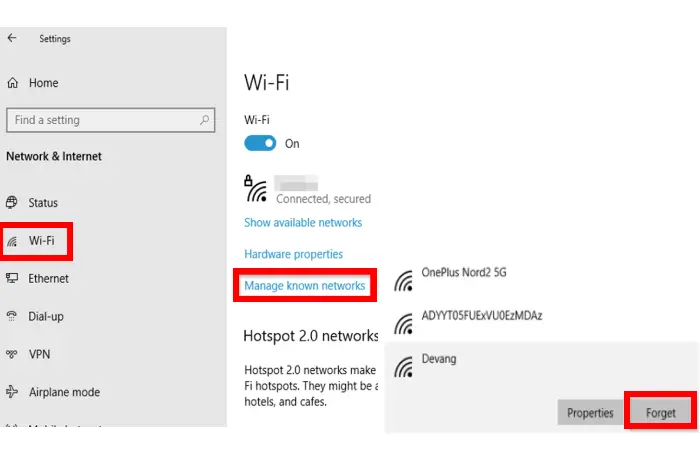
- Press laptop Windows logo + I key to open the Settings window
- Click on Network & Internet
- In the left side list click on WiFi
- In the Right side click on Manage known networks link.
- You will see a list of wireless networks
- Select your network and click to Forget.

Now scan for WiFi networks again and connect your laptop to the network.
If the problem still persists, then follow the next step.
Step 4: Network Troubleshooting
Network troubleshooting is the easiest way to check and fix the issue automatically when your laptop won’t connect to Wi-Fi. To do so, follow the below steps:
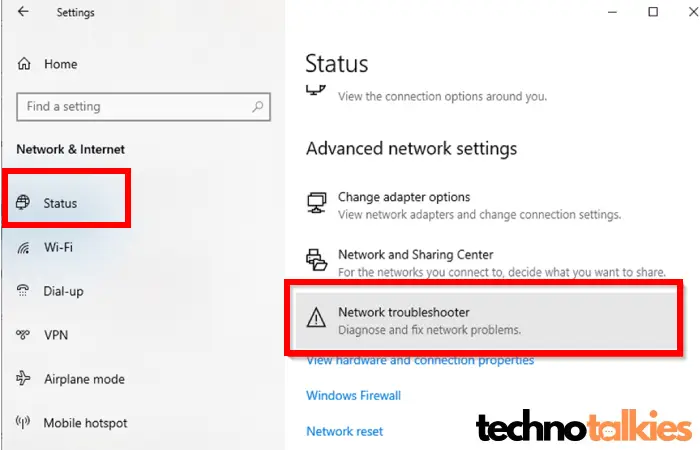
- Press Windows logo + I key to open the Settings window.
- Find and click on Network & Internet.
- In the left-side list, click on Status
- Go down and select Network troubleshooter from the Advanced network settings section.

- This will start detecting the issue go with the troubleshooter’s instruction and complete the process.
- Restart your laptop and connect to the WiFi router. Check whether you can access the internet or not.
If your laptop still won’t connect to WiFi, check if all other devices, such as tablets and mobiles, can connect to WiFi. If they can, that means your internet router is okay, and you need to troubleshoot the laptop.
Alternatively, if all other devices are also not connected to WiFi, then you should check your internet router first.
Finding and fixing the issue on the laptop side.
Step 5 : Ensure your laptop Wi-Fi is turned on
- Some laptops come with a physical WiFi button or Switch to control Wi-Fi on or off, make sure this is on.
Step 6: Ensure Wi-Fi is Enabled
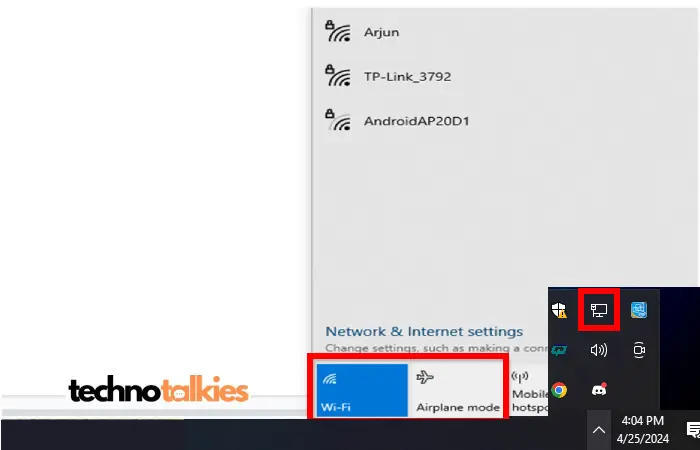
The most important step is to check whether your laptop’s Wi-Fi is not disabled or in Airplane mode. To check this follow the below step:
- Click on Network icon at the right bottom of the screen in the taskbar.
- You should find laptop Wi-Fi is highlighted in blue.
- Airplane Mode is not disabled.

If Wi-Fi is enabled and you can connect to the internet router, but not access to the internet, then follow the next step.
Note: If you’re still having trouble, try restarting both your router and laptop. Microsoft also provides a comprehensive WiFi troubleshooting guide to help resolve common connectivity issues.
Step 7: Update and Reinstall Wi-Fi Driver
An outdated or mismatched Wi-Fi driver can cause wireless connectivity issues. If your laptop won’t connect to Wi-Fi network, updating or reinstalling can fix the issue.
If you don’t know how to do this, make sure to read our article on How to Update and Reinstall Laptop’s WiFi Driver at Home.
After the updated is completed, restart your laptop and connect to the WiFi router. Check whether you can access the internet or not.
Hope, one of the above step solved the issue and now your laptop can connects to the Wi-Fi and browsing internet.
If you’re still unable to browse the internet
Try connecting your laptop to a different Wi-Fi network. Take your laptop to a different location, wherever is convenient for you, and connect to the WiFi. If the issue persists and you are unable to browse the internet, it indicates that the problem is with your laptop. To fix your laptop follow our advice:
There may be a hardware issue with your laptop, and you should contact the manufacturer or the seller for service or make a warranty claim if you have one.

