Your laptop is not behaving as you expect; it’s operating on its own, or your web browser is automatically taking you to unwanted websites. This means your laptop is likely infected by malware or a virus. At Techno Talkies, we will guide you on how to scan for and remove malware and viruses from your laptop using Windows default software.
Important Note: Detecting and removing malware and viruses in the early stages is extremely important and can cause you less damage.
Knowing that your laptop infected by malware or virus
- Laptop operating on its own
- laptop is running slower than usual.
- Ads pop up in unwanted places
- Unknown apps or browser extensions
- Automatically changes to your default browser
- web browser is automatically taking you to unwanted websites
- Repeated error messages
- Missing system files
Removing malware or virus from your laptop
Here are some effective and easy ways to remove malware or viruses from your Windows laptop. Follow this step-by-step guide:
Step 1: Stay Offline
The most common and major source for getting infected with malware or viruses is through the internet. Simply clicking on an unknown source can compromise your security.
The first step is to disconnect your laptop from the internet and power off your internet router.
Being offline from the internet doesn’t solve the problem until you completely remove the malware and viruses from your laptop. To do this, follow the steps below:
Step 2: Switch to Safe Mode
Safe Mode allows the laptop to start with only essential applications loading. So, if there are any threats, malware, or viruses on your device, they will be prevented from loading in Safe Mode.
Here’s how to get into Safe Mode:
- Click the Search in Windows taskbar.
- Type Settings and click
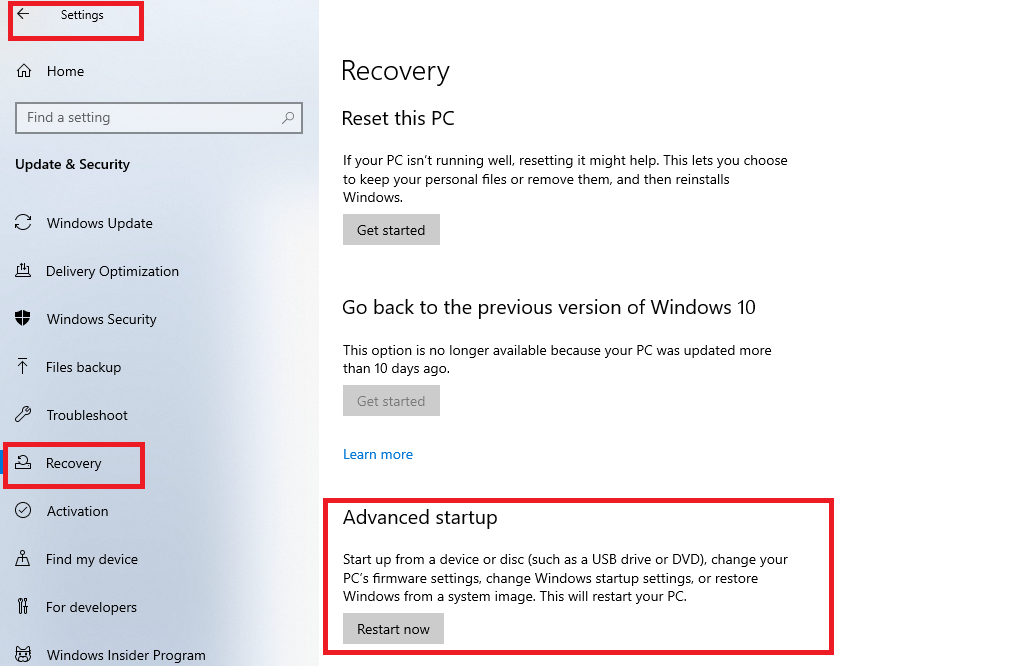
- Click Updates & Security.
- On the left side list, click Recovery Then, Click Restart now in the Advanced startup section.
- During restart the blue screen and some options will appear. Find and click on Troubleshoot.
- Click on Advanced options.
- Then Click on Startup settings.
- You will find Restart enter to restart the laptop.

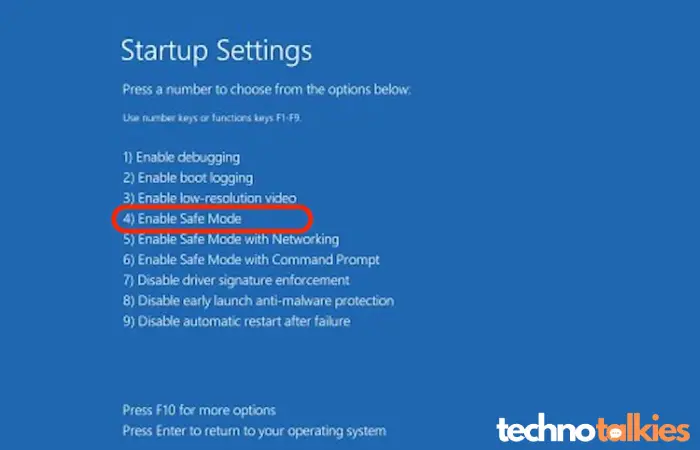
- After successfully restart another blue screen will appears, with Enable Safe Mode option.
- Select the enable safe mode option by laptop keyboard then hit enter

- laptop will start into safe mode.
Step 3: Uninstall suspicious programs
Malware or viruses usually get installed through applications; finding and uninstalling or removing those applications is the most important way to protect your laptop from threats.
If you don’t know how to do this, make sure to read our article on how to uninstall programs on a Windows laptop.
Step 4: Delete temporary files
Sometimes Threat files, Malware and Viruses are programmed to saved in the Temp Folder. Because users usually don’t scan the Temp Folder.
If you don’t know how to do this, make sure to read our article Easy steps to delete Temporary Files in windows laptop.
Step 5: Reinstall your browser
Some malware can infect your internet browser or change your default browser, so whenever you connect to the internet, it may reinfect your laptop. Additionally, it may install unsafe extensions.
Anyhow, uninstalling your internet browser is safe process. To do so:
- Click the Search in Windows taskbar.
- Type Control Panel and click
- Finding and Click Uninstall a program text link under the Programs section.
- Uninstall all the internet browsers and reinstall your favorite browser once you connect to the internet again.
Step 6. Restart the laptop into normal mode
During restart the blue screen and some options will appear. Do not select anything, Find Press Enter to return to your operating system. Just hit Enter
Step 7. Run a malware scan
Once your laptop is in normal mode, you can run Windows’ default Virus & Threat Protection. Scanning with this will remove malware, threats, and viruses. To do so, simply follow the steps below:
- Click the Search in Windows taskbar.
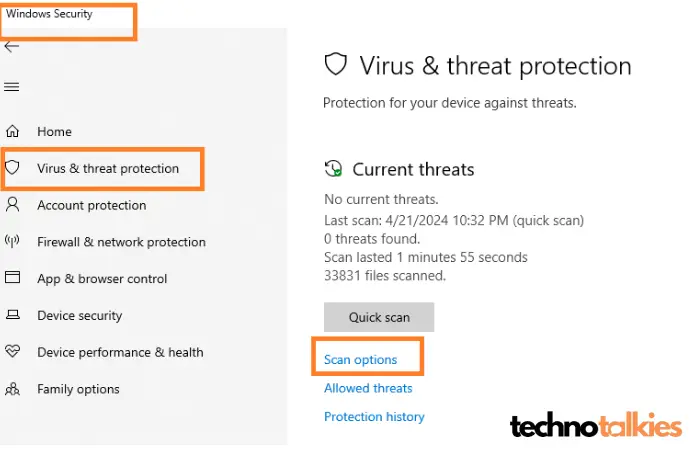
- Type Windows Security and click
- In the Left List window you will Find Virus & Threat Protection click on it
- Click on Scan Options

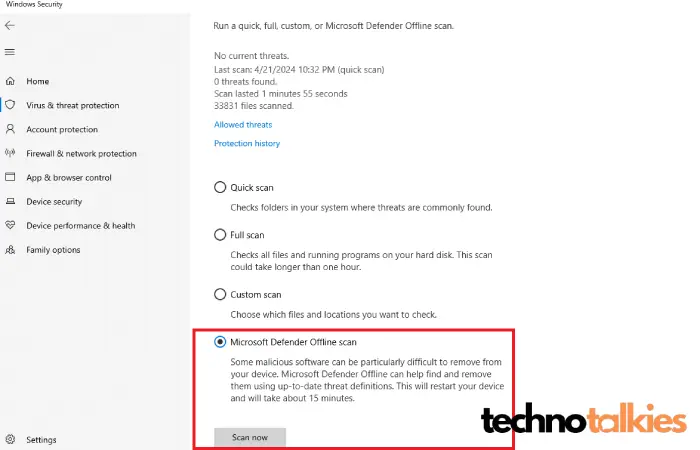
- In the down select Microsoft Defender Offline scan

- Click Scan Now
- Windows Defender will start scanning your laptop for malware, threats, and viruses. When the scan is finished, your laptop will reboot automatically.
- Return to Virus & Threat Protection options again
- If any threats found, you will find Threat History under the “Scan options” header at the top.
- And You’ll also find the name of the malware or threat under the “Quarantined threats“.
Note : If no threat found, continue using your laptop normally
- Click Threat History
- Click Remove all.
- Under the “Quarantined threats“.
- Notice On-screen instructions to complete the removal.
- You will see No threats notification under the Quarantined threats header. while removed all the malware, threats and viruses.
How to Protect your laptop from future malware and viruses.
To protect your laptop from future malware, threats, and virus attacks, consider following these steps:
- Install antivirus software
- Keep your PC’s security software always up-to-date
- Only download apps and programs from official websites
- Avoid clicking on suspicious links
- Use an antivirus browser extension
If all the above steps fail to remove the malware or viruses from your laptop, we at Techno Talkies recommend that you take your laptop to the experts or claim a warranty if available.

