

Keeping your Windows laptop up-to-date is crucial for security, performance, and access to new features. It also fixes important bugs. While Windows often updates automatically, you can schedule these updates at your convenience. In this guide, we’ll show you how to schedule automatic updates on Windows laptop so you can avoid interruptions while keeping your system running smoothly.
Why Schedule Automatic Updates?
Automatic updates ensure your Windows laptop gets the latest features and performance improvements. However, these updates can occur at inconvenient times, which may irritate you during important work. By scheduling them, you can choose the most suitable time, ensuring minimal disruption.
Here’s how you can Schedule Automatic Updates on Windows Laptop
Open Windows Update Settings
- Step 1: Click on the Windows Start Menu (generally located at the bottom of the left corner).
- Step 2: Type Settings and press Enter on gear icon to open ‘Settings.’
- Step 3: In the Settings window, select Update & Security.
Check for Updates
- Before scheduling, it’s a good idea to manually check for available updates.
- Step 1: In the Windows Update section, click on Check for updates.
- Step 2: If updates are available, let Windows download them in the background.
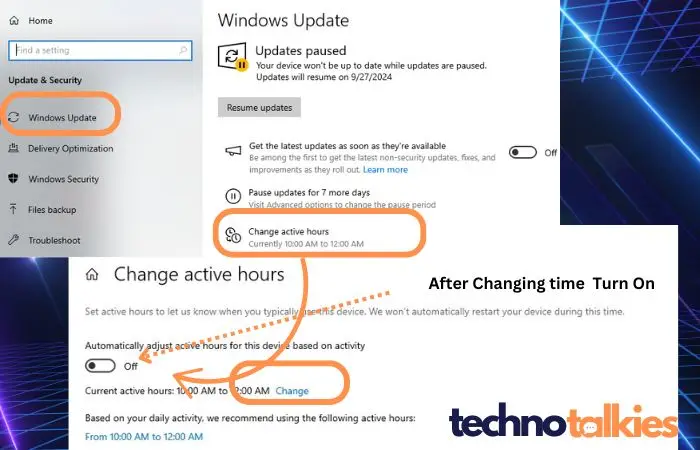
Select Active Hours to Schedule Automatic Updates on Windows Laptop
Active Hours let you specify the times you’re usually using your laptop, preventing Windows from restarting during those hours.
- Step 1: Click on Change active hours under the Windows Update section.
- Step 2: Set your preferred start and end times, ensuring updates won’t disrupt you during these hours.

Schedule the Restart
- Step 1: Once updates are downloaded, click on Restart options under the Windows Update section.
- Step 2: You’ll see a prompt to schedule a restart. Choose the Restart now or Schedule a time option.
- Step 3: Pick a date and time that works best for you, ensuring the updates happen when you’re not using your laptop.
Enable Automatic Updates
- Windows can automatically download and install updates without needing your input.
- Step 1: In Windows Update settings, click on Advanced options.
- Step 2: Make sure that Automatically download updates is turned on, so you won’t miss important updates in the future.
- Under ‘Advanced options’, you will see several options related to how updates are delivered and installed.
- Look for ‘Automatic (recommended)‘ under ‘Choose how updates are installed‘. Click on it.
Alternative Advance option (Incase above option are not worked.)
To turn on Automatic Updates yourself, follow these steps:
- Click Start, click Run, type wscui.cpl, and then click OK.
- Click Automatic Updates.
- The following options are available:
- Automatic (recommended)
This option lets you select the day and the time that updates are automatically downloaded and installed. This can be every day, or it can be on a specific day and time. - Download updates for me, but let me choose when to install them
This option automatically downloads updates, but requires user interaction to install them. - Notify me but don’t automatically download or install them
This option notifies you that there are updates available. It requires user interaction to download them and install them.
You might also be interested in reading this related topic: The Importance of Regular Windows OS Updates
Tips for Managing Windows Updates
- Pause Updates Temporarily: If you’re in the middle of an important project, you can temporarily pause updates for up to 35 days. Go to Settings > Update & Security > Windows Update, then click on Pause updates.
- Free Up Disk Space: Before large updates, check your storage by going to Settings > System > Storage. Clear up temporary files to make room for updates.
- Set a Metered Connection: If you’re on a limited data plan, you can delay automatic updates by setting your network as metered. Go to Settings > Network & Internet > Wi-Fi > Manage known networks, and toggle the Set as metered connection option.
By setting Schedule automatic updates on Windows laptop, you can maintain control over when updates happen while ensuring your system stays secure and optimized. Following these simple steps will help you stay productive without unwanted interruptions. Make sure your laptop is always up-to-date without the hassle!
You might also be interested in reading this topic : answers.microsoft.com